
The foraged-food fermentation took a little hiatus as I didn’t have many opportune weekends on which to go grasping at the last of the wild garlic, and I have not yet learned any further worthwhile forageables to put through the process.
But the bubbly liquids… I’m building up a proper collection of failures experimentation results.
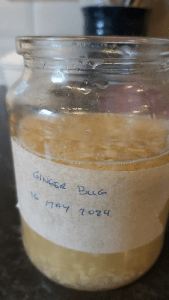
Bugged by Ginger
By all accounts, and I mean all, everywhere, across media ginger bugs are touted as being “the easiest way to start fermenting.”
I disagree 500%.
I fermented the wild garlic parts and pieces just fine – leaves, flower buds, bulbils and florets – with little more than jam jars and cheap glass fermenting weights bought through Amazon. They were perfectly edible, dare I say delicious. They were stored in the pantry. After moving to the fridge and being opened and picked at, they have not spoiled over the last two months.
My only true successes.
I have now been through three ginger bugs, first of which seemed a non-starter, second I tried to use to limited success with a tangerine simmered and sugared even as it produced very little fizz, and one which I am positive died and started decomposing – it even had gloop, which one video indicates that might be confirmation of buggy demise.
Everybody seems to have been doing ginger bugs in the last few years, probably as a craze for home-made soda alternatives (I do understand, this is precisely the band-wagon I am trying to clamber on to) and so many people give various approximated and poorly-quantified conditions.
Best I can tell, most advice assumes that your ambient “room temperature” environment is “you walk around in a T-shirt here”, which is the same problem now I recall that we faced for growing mushrooms. This is not how our flat is. We don’t run the heaters 24/7 to make an indoor simulacrum of a tropical paradise. It ain’t warm round here.
After the first failed bug, I did reckon it might be wise to give the temperatures a boost. We made space in the pots-and-pans cupboard and nestled-in a heating mat, in what is now “the fermenting cupboard.”

Over time this has worked out pretty well. The temperature is now warm and consistent in this space. We also bought a bunch of flip-top jars from IKEA which are also doing the trick well.
I’ve started a fourth bug now: water stood in a jug overnight to dechlorinate (not that I suspect any chlorine in our water), and ginger that’s been left out to capture some wild yeasts on the skin. Chopped, sugared, water, and this time in a closed jar – all the rest I had left merely covered with a cloth. I’ve seen most posts advocate covering with a cloth, but a couple that just say close the jar. I’m trying that out to see where it goes.
But given that these bugs have not yet brought any good results, and are finnicky and unreliable, what’s the successes so far ? Wine yeast.
Yeasty bug
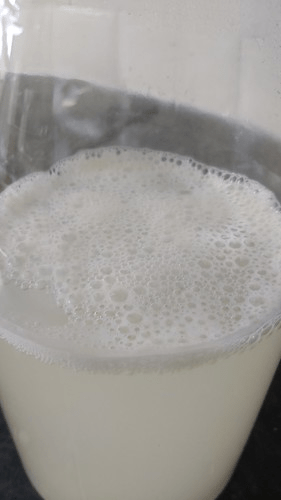
It so happened that the second ginger bug was nearly achieving bubbliness on the 7th day, but I figured I would give it a helping hand with a few granules of some wine yeast I got off of my friend Miko. The next day it was effervescent – at last! Excitement! I lost no time in cooking up a wort of a couple of tangerines I had to hand with sugar, cooling the fluid, straining, and mixing with the bug. As I recall, I made a two fundamental mistakes here, one of which was to bung it straight into the fridge.
It didn’t keep its fizz, and we had a passably enjoyable drink, though much stiller than was aimed for, and quite yeasty in flavour, what with the lees… the second mistake, I reckon.
Still (!) a first attempt completed.
As I was cooking up the fruit, I did mix up a jar of sugar, water and plain wine yeast, and set it aside. It frothed pretty well on its own, taking after just a couple of days, and I proceeded to make another drink. This time the sugar wort was made of a punnet of raspberries, and a sliced apple. This again was a rather yeasty affair, and quite sour when we opened it a few days later from fridging.
I did another yeasty bug and combined it with a wort of two punnets of raspberries, and let it sit a day in the cupboard – sour ! We finished the last drops of it this morning and found it to be much mellower… maybe we had just needed to wait, and let it ferment properly outside of the fridge a few more days originally.
Some realisations dawned on me recently as I sat down to put together an actual fermentation diary:
- Some advocates cover their bugs with a towel or a muslin cloth. Some just close the lid. I reckon I should close the lid
- Some advocates feed it every day, some every other day, and some just let the mixture sit. This is very inconsistent advice
- One guy touts a one-day bug with sugar and honey
- You’re meant to use just some of the bug juice in the second fermentation with the wort, not the whole lot. Spare the lees, and make more drink from a single bug !
- Primary fermentation happens with lid closed in the fermentation cupboard / warm space ! This is where burping every day is a needed practice
- Transfer the primary ferment to bottles for their secondary stage and let them further ferment at “room temperature” for a while – I’m doing just a couple of days for a basic soda – before moving to a fridge
Not adding the bug lees to the primary ferment has two benefits : the resultant drink is not quite so murky (it does still develop some of its own lees though) , and the lees still contain workable material – just add more water and sugar, and let it keep going !
Mind, it is probably a good idea to reserve some of the bug for producing the next bug, and removing the bulk of the lees entirely.
One Q&A video answers some of the questions I have to a certain extent, but I am still going to experiment.
I did try to do a yeasty bug at the office with some bread yeast, but it ended up same as the sima from last month – rather yucky. One day in, and the bread yeast had clearly decided it wanted to progress its career to eau de sourdough , so I just let it go.
I’ve since bought a small tub of wine yeast of my own, and have been researching tibicos (a.k.a. water kefir) grains as another potential sodafier. Those need “activating” first for a couple of days, like a bug – but unlike with the yeast where we tip the lees and keep the juice, tibicos needs the other way round : keep the activated grains, and chuck the fluid, and add the grains directly to the wort. Ferment this, and then bottle-up.
| Yeasty bug | Tibicos |
| Yeast in sugar water as primary ferment (2-3 days) Ginger and wild yeast can be up to a couple of weeks (or longer), depending on environment. | Activate the grains in sugar water, couple of days (? I simply got this from one video off of Joshua Weissman) |
| Mix juice with wort, and do the primary ferment | Mix grains with wort, and do the primary ferment |
| Bottle, do secondary ferment, and refrigerate | Bottle, do secondary ferment, and refrigerate |
The more I look into things however, the more I am realising that there may be even further shortcuts here, combining the primary phase and secondary phase together, and isolating the liquid only for the direct purpose of bottling. It’s something I might do as a comparison experiment, at the risk of having another duff batch – but there’s no real harm in trying… hasn’t it been done before ?
All Bugs
It turns out though that “ginger bug” is not the only game in town, even though it’s the most well known.
Another popular fizzy fermented drink is elderflower champagne. No, la région de Champagne has not given its name to this, but nobody is really going to mistake it for the DOP real thing… Like most ginger bug videos, youtubers make it look so easy. I’ll give it a go when the elderflowers are in season. Wait… that’s NOW ! Notably, the elderflower fizz recipes tend to just lump everything into a bucket and start this as the primary ferment altogether before bottling up.
Pine sodas are on the rise too – I saw one on a chef Insta some time ago, and have been coming across more of them since. This indicates to me that pretty much any wild plant should be carrying wild yeasts – you just need to allow the fermentation to happen ! Additionally, these pine sodas are usually shown to be bugged, primary and secondary fermented all at once… so… why the multi-step process? This certainly warrants further experimentation…
Following all the above logic, it shouldn’t be unimaginable to pick a whole bunch of edible flowers of any sort – forsythia, rose petal, haw flowers, and on and on – or leaves typically used for herbal teas – haw berry, linden leaf, and of course the usual panoply of herb garden bits – and turn them into their own unique kind of fermented fizzy drink.
Literally any fragrant wild plant could be used for the purpose, and provided the local wild yeasts are present and efficacious, fizz will be found. Short of which, prime with wine yeast.
Airing Some Fizz Concerns

As I was jarring up an experimental pak-choi kimchi-esque dealy-o, I realised something of the polar opposites of preparing drink and food ferments: it’s safest to have a bit of margin in the drink ferment as it will produce quite a bit of CO2 , but in the food ferment, oxygen is the enemy – pack the sucker to the brim and bring the weight. Thankfully I am only aiming for soda, so I have no intent on fermenting the drinks a long time. Maybe I’ll fill one bottle tighter some time to see if I get better carbonation. At the risk of having quite a bit of cleaning to do.
For beginners though:
A food ferment should suffer no air
A bug ferment should have room to spare
🥬🫙

Leave a comment